Layout Managers in Java - Flow Layout and Border Layout With Examples

Table of Contents
- Introduction
- What is Layout Managers ?
- Types of Layout Managers
- Introduction to Flow Layout
- Types of Constructors
- Source Code for each Constructor and its output
- Introduction to Border Layout
- Types of Constructors
- Source Code and Output of each Constructor
**********************************
Introduction
In our previous chapter of learning GUI Based
Desktop Application, we learn about the Java SWING and Java AWT (Abstract
Window Toolkit). I hope you have read it carefully and understood it. Also we
have learnt how to make the basic frame needed to start to develop a desktop
based GUI application.
What is Layout Managers?
Layout Managers are used to arrange the components in
a particular manner in which different components are added to make the GUI
applications. Also Layout Managers enables us to control the components and
it’s arrangement to display them visually. It also helps to determine the size
and the position of the components in the frame.
There are 5 different types of layout managers which
are commonly used, they are;
- FlowLayout
- BorderLayout
- GridLayout
- GridBagLayout
- CardLayout
FlowLayout :
It is the
simplest layout manager in which components are arranged in top to
button and left to right. The components are displayed according to the order
of the component added to the frame i.e first components added will show at first and so on.
There are three constructor of FlowLayout, they are;
A) FlowLayout():
It is the first constructor in which the components are aligned to the center
and gives 5 unit of horizontal and vertical gap between the components. We
cannot control the alignment and also horizontal gap and vertical gap between
them.
Let’s see the source
code and its output of flow layout with first constructor;
/*
A SWING GUI TO DEMONSTRATE THE
FLOWLAYOUT
*/
package LayoutManagers;
/**
*
* @author AnkitPC
*/
import javax.swing.*; // for swing
components
import java.awt.*; // for layout
managers
public class FlowLayoutDemo {
JFrame f;
JButton b1,b2,b3,b4;
//create constructor
FlowLayoutDemo(){
f=new JFrame("Flow Layout
Demo");
f.setSize(400,300);
f.setDefaultCloseOperation(JFrame.EXIT_ON_CLOSE);
f.setLayout(new FlowLayout()); // first
constructor
b1=new JButton("One");
b2=new JButton("Two");
b3=new JButton("Three");
b4=new JButton("Four");
f.add(b1);
f.add(b2);
f.add(b3);
f.add(b4);
f.setVisible(true);
}
//main method
public static void main(String[] args) {
//call constructor
new FlowLayoutDemo();
}
}
In the given program above, we have demonstrated the flow layout with its first constructor. In the below image of flow layout, you can see the output of it. Here all the components are aligned to the center and have 5 units of horizontal and vertical gap between them. It is the simple and basic way of adding the components. Also you can see that the component added first shows at first and so on. It means that you have to add the components serially.
Output:

B) FlowLayout(int
align): It allows you to provide the alignment but the
horizontal gap and vertical gap between the components is 5 units. The
parameter passed in the constructor are FlowLayout.RIGHT, FlowLayout.LEFT
and FlowLayout.CENTER.
For example;
setLayout(new
FlowLayout(FlowLayout.RIGHT);
Let’s see the source
code and its output of flow layout with second constructor;
/*
A SWING GUI TO DEMONSTRATE THE FLOWLAYOUT
*/
package LayoutManagers;
/**
*
*
@author AnkitPC
*/
import javax.swing.*; // for swing components
import java.awt.*; // for layout managers
public class FlowLayoutDemo {
JFrame f;
JButton
b1,b2,b3,b4;
//create constructor
FlowLayoutDemo(){
f=new JFrame("Flow Layout Demo");
f.setSize(400,300);
f.setDefaultCloseOperation(JFrame.EXIT_ON_CLOSE);
f.setLayout(new FlowLayout(FlowLayout.RIGHT)); // second constructor
b1=new JButton("One");
b2=new JButton("Two");
b3=new JButton("Three");
b4=new JButton("Four");
f.add(b1);
f.add(b2);
f.add(b3);
f.add(b4);
f.setVisible(true);
}
//main method
public static void main(String[] args) {
//call constructor
new FlowLayoutDemo();
}
}
The above source code is for the second constructor of flow layout. In this second constructor, we are able to change its alignment here but the horizontal and vertical gap between the components remains the same. In this program, i have used FlowLayout.RIGHT which means the components is aligned to right. And as per the need you can change the alignment here.
Output:

C) FlowLayout(int
align, int horizontal_gap,int vertical_gap): It allows you
to specify the both alignment of components and horizontal gap and vertical gap
between the components. Here in the
alignment parameter the same value is passed and in horizontal and vertical gap
the integer value is passed.
For example;
setLayout(new FlowLayout(FlowLayout.RIGHT,10,10);
Let’s see the source
code and its output of flow layout with third constructor;
/*
A SWING GUI TO DEMONSTRATE THE FLOWLAYOUT
*/
package LayoutManagers;
/**
*
*
@author AnkitPC
*/
import javax.swing.*; // for swing components
import java.awt.*; // for layout managers
public class FlowLayoutDemo {
JFrame f;
JButton b1,b2,b3,b4;
//create constructor
FlowLayoutDemo(){
f=new JFrame("Flow Layout Demo");
f.setSize(400,300);
f.setDefaultCloseOperation(JFrame.EXIT_ON_CLOSE);
f.setLayout(new
FlowLayout(FlowLayout.RIGHT, 20,20)); // third constructor
b1=new JButton("One");
b2=new JButton("Two");
b3=new JButton("Three");
b4=new JButton("Four");
f.add(b1);
f.add(b2);
f.add(b3);
f.add(b4);
f.setVisible(true);
}
//main method
public static void main(String[] args) {
//call constructor
new FlowLayoutDemo();
}
}
The above source code demonstrate the third constructor of the flow layout. By using this constructor we can change its alignment and also the horizontal and vertical gap between the components. As you can see in the output that there is Right alignment and 20 units of horizontal and vertical gap between the components.
Output:

Border Layout:
Introduction:
Border Layout is the default layout of the frame/container. It arranges the components according to five different regions, they are; east, west, center, north and south. In each region only one component can be added. And the region is also named as EAST, WEST, NORTH, SOUTH and CENTER.The Border Layout also has two constructors, they are;
a) BorderLayout()
b) BorderLayout (int horizontal_gap, int vertical_gap)
A) BorderLayout(): It is the first constructor which creates the layout with no gap between the components. It is a default constructor which is used in frame when we do not set any layout.
For example;
// setting the layout to the frame
setLayout(new BorderLayout());
// while we add the components to the frame
add(component_name, BorderLayout.SOUTH);
Let’s see the source code and output now;
/*
A SWING GUI TO DEMONSTRSTE THE BORDER LAYOUT
*/
/**
*
* @author AnkitPC
*/
//importing the required packages
import javax.swing.*; //for components
import java.awt.*; //for layout
public class BorderLayoutDemo {
JFrame f;
JButton b1,b2,b3,b4,b5;
//constructor
BorderLayoutDemo(){
f=new JFrame("Border Layout Demo");
f.setSize(400,300);
f.setDefaultCloseOperation(JFrame.EXIT_ON_CLOSE);
//set the layout
f.setLayout(new BorderLayout()); //first constructor
b1=new JButton("NORTH");
b2=new JButton("SOUTH");
b3=new JButton("EAST");
b4=new JButton("WEST");
b5=new JButton("CENTER");
//add components to the frame
f.add(b1,BorderLayout.NORTH);
f.add(b2,BorderLayout.SOUTH);
f.add(b3,BorderLayout.EAST);
f.add(b4,BorderLayout.WEST);
f.add(b5,BorderLayout.CENTER);
//set the frame visibility to true
f.setVisible(true);
}
//main method
public static void main(String[] args) {
//call the constructor
new BorderLayoutDemo();
}
}
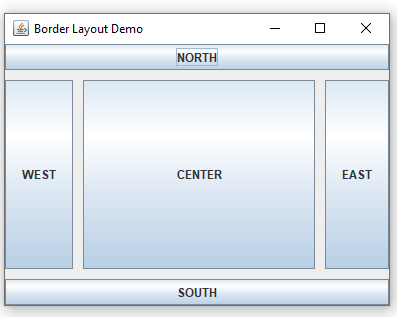
The given source code demonstrate the use of first constructor of Border Layout. As we know that it arranges the components in five different regions i.e EAST, WEST, NORTH. SOUTH and CENTER. It does not provide the horizontal and vertical gap between the components.
Output:

B) BorderLayout(int horizontal_gap, int vertical_gap): It is the second constructor where you can specify the horizontal and vertical gap between the components. Integer values are passed to its parameter.
For example;
//setting the layout to the frame
setLayout(new BorderLayout(10,10);
// while we add the components to the frame
add(component_name, BorderLayout.SOUTH);
Let’s see the source code and output now;
/*
A SWING GUI TO DEMONSTRSTE THE BORDER LAYOUT
*/
/**
*
* @author AnkitPC
*/
//importing the required packages
import javax.swing.*; //for components
import java.awt.*; //for layout
public class BorderLayoutDemo {
JFrame f1;
JButton b11,b12,b13,b14,b15;
//constructor
BorderLayoutDemo(){
f1=new JFrame("Border Layout Demo");
f1.setSize(400,300);
f1.setDefaultCloseOperation(JFrame.EXIT_ON_CLOSE);
//set the layout
f1.setLayout(new BorderLayout(10,10)); //second constructor
b11=new JButton("NORTH");
b12=new JButton("SOUTH");
b13=new JButton("EAST");
b14=new JButton("WEST");
b15=new JButton("CENTER");
//add components to the frame
f1.add(b11,BorderLayout.NORTH);
f1.add(b12,BorderLayout.SOUTH);
f1.add(b13,BorderLayout.EAST);
f1.add(b14,BorderLayout.WEST);
f1.add(b15,BorderLayout.CENTER);
//set the frame visibility to true
f.setVisible(true);
}
//main method
public static void main(String[] args) {
//call the constructor
new BorderLayoutDemo();
}
}
The given source code demonstrate the use of second constructor of Border Layout. As we know that it arranges the components in five different regions i.e EAST, WEST, NORTH. SOUTH and CENTER. We can specifically provide the horizontal and vertical gap between the components.
Output:
